Cornflake Tart: A Quintessential Retro British Dessert
If you’re craving a taste of nostalgia, look no further than the classic cornflake tart. This simple pudding dates back to post-war Britain, and yet it still captivates with its crunchy texture, golden syrup sweetness, and jammy base. In this blog, I’ll walk you step by step through how to make a cornflake tart that’s true to tradition—and delicious in every bite.
What is a Cornflake Tart?
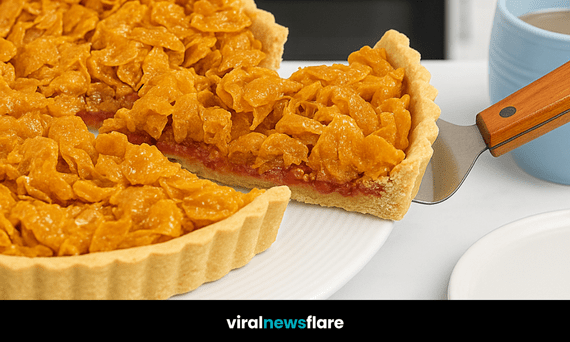
A cornflake tart is a traditional British dessert comprising a shortcrust pastry shell spread with jam, topped with cornflakes bound in a golden syrup and butter mixture. It’s crunchy, sweet, and utterly moreish. Essentially, it’s a school-dinner classic resurrected for the home kitchen.
This pudding is beloved for its simplicity. Few other desserts combine minimal ingredients with such nostalgic flavour. Plus, children often delight in watching cereal become pie topping.
Origins and Nostalgia
The earliest known recipes for cornflake tarts appeared in post-war cooking guides in the late 1940s. The idea was likely born from resourceful cooks combining pantry staples. Over time, it became a staple in school dinners through the 1970s and 1980s. Even though many restaurants no longer feature it, it still holds a special place in British hearts.
Cornflakes themselves date back to 1894, when the Kellogg brothers stumbled upon a method of turning dough into thin, baked flakes. Over time, their cereal became ubiquitous, and inventive cooks sought new ways to use it. Thus, the cornflake tart was born.
Ingredients You’ll Need
To make a cornflake tart that yields about 10 generous slices, gather:
Pastry
-
275 g plain flour
-
125 g cold, cubed unsalted butter
-
3 tbsp sugar
-
1 large egg
-
1–2 tbsp cold water
Filling
-
60 g unsalted butter
-
130 g golden syrup
-
2 tbsp brown sugar
-
Pinch of salt
-
130 g raspberry jam
-
100 g cornflakes
If you prefer, you may use ready-made shortcrust pastry to skip the pastry-making steps entirely. Just ensure it is fully thawed and at workable consistency.
If you can’t find golden syrup, possible substitutes include corn syrup, honey, or maple syrup—but note these differ in taste and stickiness.
Step-by-Step Method
Here’s how to bring your cornflake tart to life:
-
Make the pastry.
Combine flour and butter until it resembles fine breadcrumbs. Use a food processor, or rub by hand (keeping everything cold). Add sugar, then the egg and 1 tbsp water. Mix gently until dough forms. If too dry, add the second tbsp water.
Shape into a ball, wrap in cling film, and chill for 30 minutes. -
Roll and line the tin.
On a floured surface, roll the dough to about 0.5 cm thick. Line a 23 cm fluted tart tin, pressing into the base and edges. Leave about 2.5 cm (an inch) overhang. Trim later. Prick the base lightly with a fork. Chill again for 30 minutes. -
Blind bake the shell.
Preheat the oven to 190 °C (370 °F). Cover the pastry with baking paper and baking beans. Bake 15 minutes. Remove beans and paper, then bake another 5–10 minutes until the base is golden. While still hot, slice away excess pastry to create a clean edge. -
Prepare the filling.
In a saucepan over low–medium heat, melt butter, golden syrup, brown sugar and a pinch of salt. Stir until fully combined, then remove from heat. Stir in the cornflakes, ensuring every flake is coated. -
Assemble and finish baking.
Spread raspberry jam evenly over the cooled pastry shell. Spoon over the cornflake mixture and press gently. Return to the oven for 5–7 minutes, just until the cornflakes are lightly toasted. -
Cool, slice, serve.
Allow the tart to cool a little before slicing. Serve it warm, or at room temperature.
Serving, Storage & Tips
What to Serve With It
Cornflake tart is lovely with warm custard or a little cream. Alternatively, serve it solo—its textures and flavours are satisfying on their own.
How to Store It
Store leftovers in an airtight container in the refrigerator for up to 3–5 days. The cornflakes may soften over time, and the syrup might creep, but it remains tasty. You can also freeze the tart (well wrapped) for up to 3 months. Thaw before serving, and consider warming it slightly in the oven.
Pro Tips (for a Perfect Cornflake Tart)
-
Keep ingredients and hands cold when making pastry to prevent shrinkage.
-
Make sure cornflakes are thoroughly coated—this helps the topping bind.
-
You don’t need to grease the tin; the butter in the pastry helps it release.
-
Use a loose-base tin if possible to ease removal.
-
Let it cool fully before unmoulding so it holds its shape better.
Variations to Try
Although this cornflake tart recipe is classic, small tweaks can make it your own:
-
Swap raspberry jam for strawberry, gooseberry or rhubarb jam.
-
Use smaller tart tins for individual servings.
-
Add a sprinkle of chopped nuts (e.g. walnuts) to the cornflake mixture for extra texture.
Cornflake tart is more than a pudding—it’s a memory, a taste of something comforting and simple. With its crunchy top and jammy base, it’s perfect for teatime or dessert. Give this recipe a go, and I’m confident it’ll become a favourite in your household.